
Whether you’re a farmer or hobby gardener, knowing your planting zone is vital to selecting the right plants for your area. Each area of the country is given a planting zone by the USDA, which indicates the general climate in that area. Then, each plant is given a range of zones that it can grow in.
Therefore, by knowing you’re zone, you can find out exactly what plants grow well in your area. You can also figure out the specific variety of each plant you should get.
Planting zones may seem like a minor detail, but they are truly the secret weapon you need to grow a successful garden. To provide you with even more help, we’ll also take a look at some other growing tips for planting in North Carolina.
What is a Planting Zone?
Gardeners rely on planting zones, also known as hardiness zones, to determine which plants can survive in their area. These zones are defined by the average minimum temperature of a region and serve as a guide to understanding the local climate. By using planting zones, gardeners can choose plants that are more likely to thrive in their area’s temperatures.
Simply put, a plant that grows well in Florida won’t grow well in Alaska. That’s pretty straightforward. However, what about the difference between Alabama and North Carolina? There, the very specific rating system of planting zones helps us see exactly what plants can thrive where.
The USDA created these zones to be used by farmers and gardeners nationwide. The nation is divided into several zones, mostly determined by the area’s average minimum winter temperature.
You should select plants that are well-suited to your planting zone. This helps increase the plant’s chance of survival and overall health. You’re less likely to end up with plants that cannot stand the heat of the summer or don’t reach their harvest time before your first frost date.
You’ll also help save a bit of water. Plants that are adapted or native to North Carolina’s planting zones should be used to the amount of rainfall you get, which will limit the amount of extra watering you need to do.
North Carolina’s Planting Zones
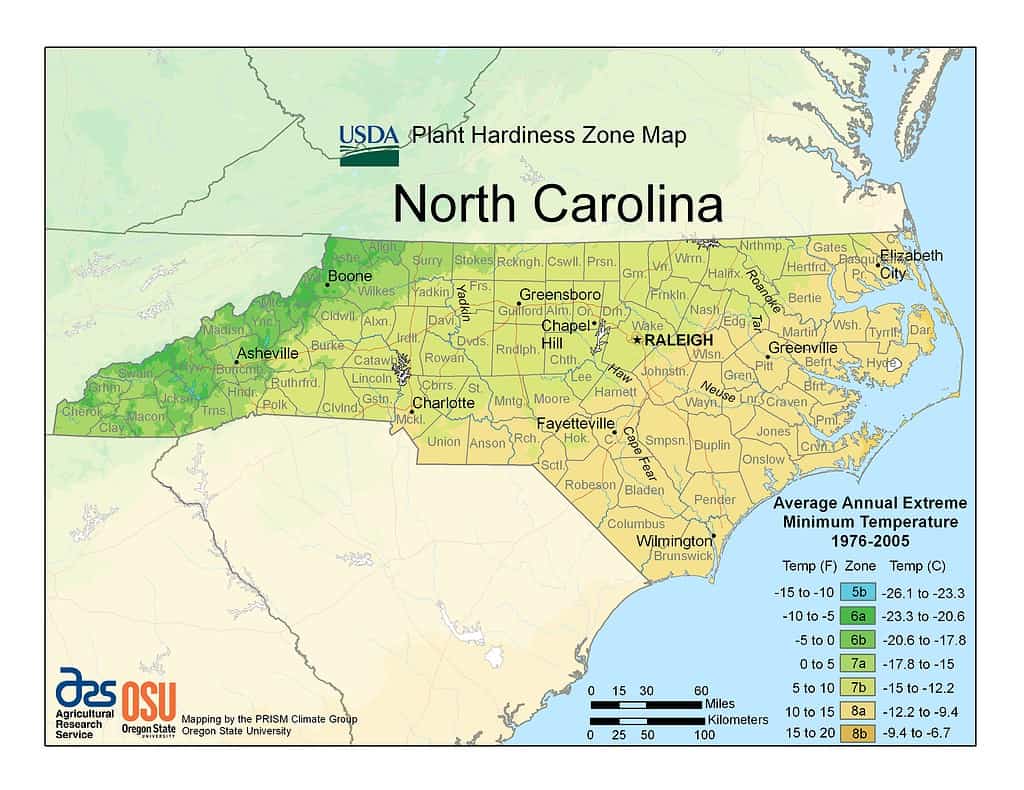
North Carolina’s planting zones range from 8b on the eastern coast to 5b high in the mountains. Most of the state is somewhere in between, though. Don’t rely on this range, as North Carolina varies a lot in climate. Instead, find your exact growing zone on the map above.
This map is the official one created by the USDA, making it the most accurate source.
The zones are determined by the annual minimum temperature. As you might imagine, eastern North Carolina has much milder winters than western North Carolina, hence the significant difference in the growing zone.
Plants that can grow on the warmer coast are not the same ones that can grow in the mountains, where it gets much colder. Therefore, you may need to select different plants depending on where in North Carolina you’re located.
Here is a quick breakdown of some of the more common zones in North Carolina:
- Zone 5a: Found in the high elevations of the western mountains, this zone experiences colder winters with temperatures as low as -20°F (-29°C). Gardeners in this zone need to choose cold-hardy plants and take precautions to protect them from harsh winter conditions.
- Zone 6b: This zone covers much of the Piedmont region and experiences milder winters, with minimum temperatures around -5°F (-21°C). It allows for a wider range of plant choices compared to Zone 5a.
- Zone 7a: Extending across the central part of the state, Zone 7a experiences even milder winters with minimum temperatures around 0°F (-18°C). This zone offers a more extended growing season and a broader selection of plants that can thrive.
- Zone 8b: Along the coast and in the southeastern part of North Carolina, Zone 8b has mild winters with minimum temperatures around 15°F (-9°C). Gardeners in this zone can grow a wide variety of plants, including many tropical species.
Tips for Planting in North Carolina
1. Know Your Planting Zone
As we’ve discussed in this article, knowing your planting zone is essential. North Carolina’s planting zones vary, so be sure you figure out your exact one. It helps ensure you select plants that can thrive in your area’s temperatures. Otherwise, you may be fighting an uphill battle.
We recommend consulting our map above to figure out exactly what growing zone you’re in.
2. Select Native Plants
When possible, choose plants that are native to your region. These plants evolved to grow in your area, so they are adapted to the local conditions. They’re often much hardier and more resistant to the pests and diseases around you.
Plus, they can also support local wildlife, which has evolved to work next to these plants.
3. Consdier Microclimates
Planting zones represent the larger climate surrounding you. However, you should also consider microclimates, which are the very specific conditions of the specific place you’re planting. For instance, what side of the building you’re planting on will determine exactly how much sun a plant gets.
Variations of sunlight and wind exposure will occur all throughout your yard. Choose plants that can grow in that specific area, on top of paying attention to your planting zone.
4. Mulch
Mulch serves as a protective barrier, which helps maintain soil moisture and regulate soil temperature. Plus, it can also reduce weed competition. Organic mulch materials, like wood chips and straw, can help enrich soil as they break down.
Mulching may just be one more thing you need to do in your garden, but it can help your plants thrive.
5. Water Wisely
It’s better to water less often and deeply than frequently and shallowly. You want to encourage a plant’s roots to grow downward – not out. Making sure the top of the soil dries up between waterings can help that happen.
We highly recommend a drip irrigation system, which minimizes water wastage. Plus, a drip line prevents the foliage of the plant from getting wet, which helps reduce the spread of pests and diseases.
6. Soil Testing
Before planting anything, you need to test your soil’s pH and nutrient levels. Different plants will prefer a different pH and require different nutrients. Testing is the only way to figure out exactly what your soil has and adjust accordingly.
Based on your results, you may need to amend the soil with fertilizers, lime, or sulfur.
7. Compost
You can also add compost to the soil to enrich it. Compost adds nutrients, improves its structure, and enhances moisture retention – all good things for your garden.
However, keep in mind that compost will change your soil’s composition. Therefore, you may want to soil test after adding compost for an accurate reading.
8. Plant at the Right Time
Planting at the correct time is essential to helping your garden flourish. We highly recommend consulting a local planting calendar, as exactly when you should plant varies widely. At the very least, you need to do it after the last frost date in your area.
9. Protect from Frost
Sometimes, no matter how well you time your planting, you may get a random frost. Late spring and early fall frosts can damage plants. Cover sensitive plants with cloths or frost cloth, securing them to prevent heat loss.
Stay informed about frost advisories in your area. Weather stations should put out a warning regarding frost.
10. Prune and Deadhead
You may need to prune and deadhead some plants. This process involves removing diseased or spent growth to allow for new growth. It helps keep your garden clean and aesthetic, while also helping your plants grow.
11. Pest and Disease Management
Regularly inspect your plants for signs of pests or diseases. Identify problems early to prevent them from spreading. You should make checking your plants part of your daily routine, as diseases and pests can spread quickly. (A tomato hornworm can devour a tomato plant in 48 hours.)
Be sure to check the underside of the plant’s leaves, as this is where most diseases start. Any unusual coloration or growth should be checked.
The photo featured at the top of this post is © Sara Kendall/Shutterstock.com


How to Add Us to Google News


Thank you for reading! Have some feedback for us? Contact the AZ Animals editorial team.